HOW TO NIP CHINA TILES AND FOCALS
 I have a few tips some of you may find useful if you want to convert your pretty vintage plates into pretty china tiles and focals
 Now, most how to websites offer the hammer method. I beg you to leave the hammer to the nails and get some wheel nippers! There are some good deals on ebay and you can find them in any hobby store. I purchased my first pair at Michaels years ago. Lowes and Home Depot (and other national chain hardware stores) do not carry the wheel nippers, but they do offer other kinds of tile nippers that a more advanced artist may find useful.
I have five different kinds of nippers; each provides a specific use. But for beginners, start with the wheel nippers, they can accommodate most tasks.
Now before you being nipping, get organized. It is helpful to have contact paper handy. I like to use Mosaic Mount; yes, it's more expensive but the benefits are well worth it to me.Mosaic mount does not leave any residue on your nipped tiles and it does not dry out. I have some patters on Mosaic Mount that have been there for over 3 years at least! (Now, just between us, in an emergency situation, I have been known to use the blue painters tape; don't tell anyone ok!? ;-p)
You can find Mosaic Mount in rolls or sheet. I buy the rolls; more cost effective and more flexible for varying size layouts. It also makes creating stepping stones a breeze! (I will go into detail about creating beautiful stepping stones in the near future).
Have some plastic zip lock bags or paper bowls handy to keep your tiles organized as you go. (I keep 3 large gallon bags handy, one for the bottom rims that have any floral design on them…don’t ask my why...I dunno lol!; another for the white pieces for filler, and a third to collect any hallmarks on the bottom.)
HOW TO NIP STRAIGHT TILES:
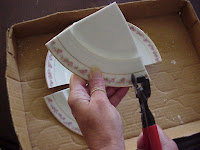
First nip to divide the plate in half keep your nippers as straight as you can. Next nip one of the halfs into half; that will be your starting quarter.
Take one of the quarters and start nipping your straight tile pieces. Keep your nips as straight as you can. Keep your quarters in order, so that you can place each tile onto the mosaic mount.
You can place each tile face down or face up (back of tile onto the adhesive). This process is fairly simple and you be a pro at it in no time at all! Do be sure to save any hallmarks and flat white center pieces for future use.
HOW TO NIP OUT A FOCAL
Focals are the center design of the plate. To nip them out successfully, you will have to get around the bottom rim of the plate. The bottom rim can be a bugga!
For this example, I'm using smaller vintage plate that is about 4" in diameter. Since the center is the only design, I need not worry about rim pieces; but I will still save them for future use.
Your first nip will be an angled nip. Try to keep the nippers parallel to the rim.
After the first nip, work your way to the outside edge of the bottom rim. Once there, continue to nip all the way around the plate.
Turn the center over and place your nipper against the inside of the rim. Use the inside of the rim as your guide as you nip around the center.
Then, keeping the same angle, nip around the inside of the rim.
Voila! You have your focal!
To achieve a smooth circle, you can nip down the more pointed areas, or use a dremel to smooth them out. I usually just nip. The face rims can easily be nipped into useable pieces. (These outer rim pieces are great to use on the edge of a table, gives a cleaner finish.)
This method works most of the time for me. Once in a while the plate doesn’t want to cooperate, c’est la vie!
Occasionally you will have a plate with both a beautiful design around the face rim as well as the center. Unfortunately, you will have to decide which you want more. The example shown took two plates total; once plate for the focal, one for the face rim design.
With a little practice, you will have no problem learning how to use your wheel nippers for the best results. Just remember, you are creating a mosaic, there are no wrong nips!
Please feel free to post your comments or questions on here, or email me anytime!
Please note, my content is copyright with exclusive rights. Please do not copy my content (text, photographs, illustrations) into any printed form or any form of publication.
Happy Nippin!!


Comments
Post a Comment